| Home |
|---|
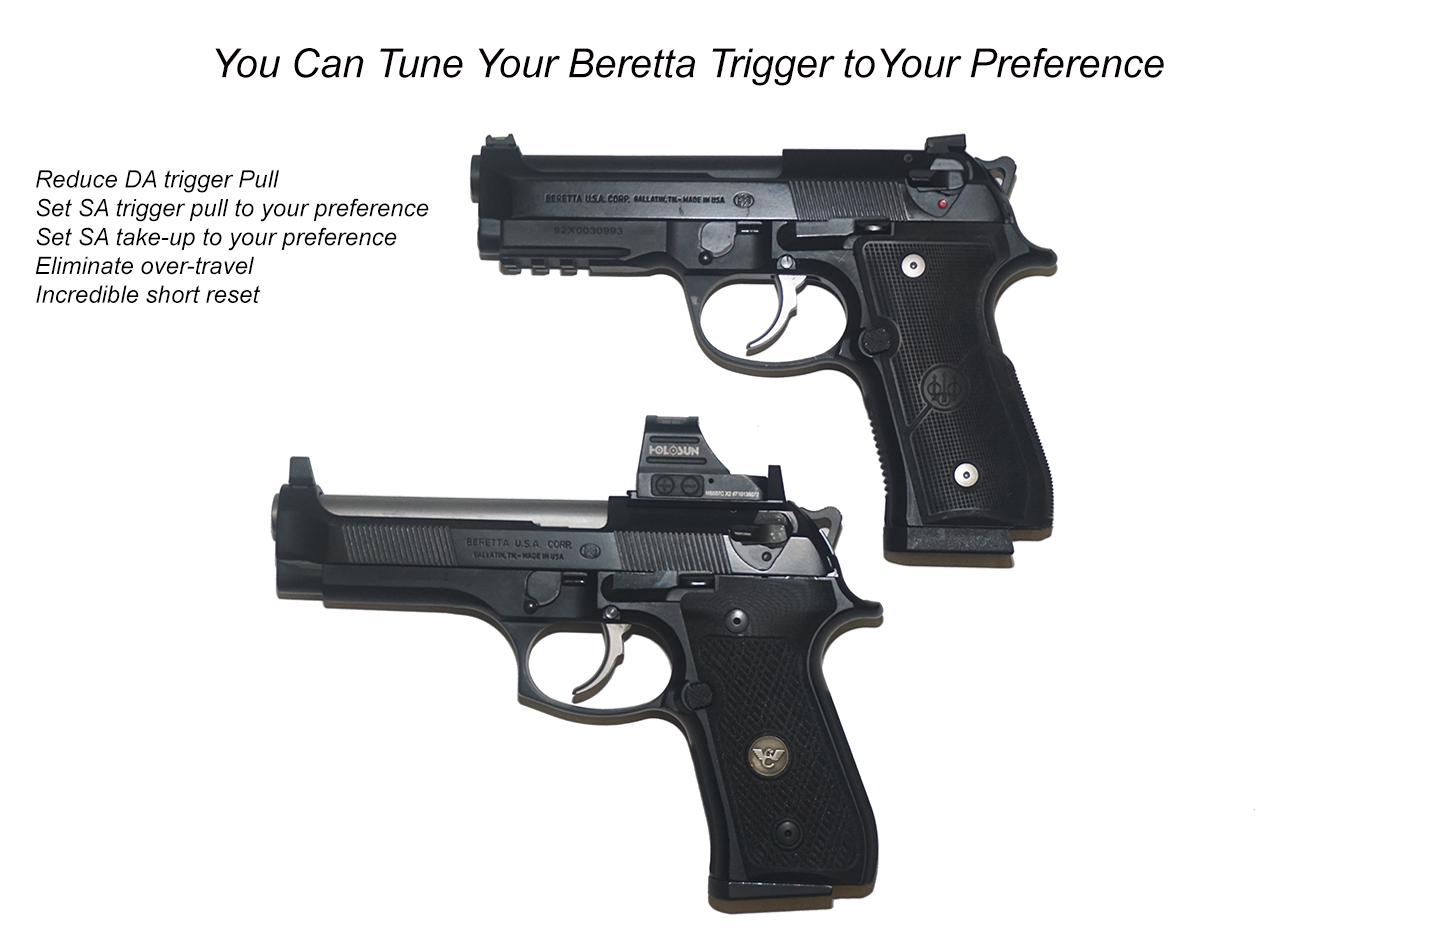
The Beretta 92 is one of the most tunable handguns available. It is possible to reduce the DA trigger pull and tune the SA trigger to exactly your preference. There are Beretta 92 trigger upgrade kits available form Langdon Tactical and MCARBO that will do a great job upgrading your trigger but you can also do it without a trigger kit. Some upgrade components are necessary; they are listed in this procedure.
The procedures in this document were performed on a Beretta 92x Centurion but have also been done on my 1990 Beretta 92FS. At every step, the results were measured so that the reader understands what to expect from each action. Measurements were done with a Wheeler Digital Trigger Gauge averaging at least five measurements. When reading this document, weights are expressed in pounds,ounces. Example: 3,5 is 3 pounds 5 ounces.
Using this procedure below are the my results with the 92x Centurion
| DA Trigger Pull lbs,oz |
SA Trigger Pull lbs,oz |
Reset | S/A Take-up | Over-travel | |
|---|---|---|---|---|---|
| Factory | 7,5.8 | 5,2.8 | 5.5mm | 5.6mm (.22") | 0 |
| After Work | 12# Spring 5,12 13# Spring 6,8 |
2,15 | 2mm | 3mm | 0 |
I set my 92x Canturion up to my preference, however, S/A trigger weight, and SA take-up can be tailored to your desired values. SA take-up can be as small as 2mm. The Beretta 92x has virtually no over-travel. The 92FS did have significant factory over-travel; the 92FS over-travel is eliminated with the Langdon Tactical Optimized Trigger Bar.
To achieve the results above or your desired results, a few parts are necessary. The required parts are listed below:
You do not need a new sear spring. A SA trigger weight of 3# or less can be obtained with a slight modification to the stock Beretta trigger spring. The hammer spring can be purchased from Langdon Tactical or Willson Combat. After the upgrade is complete it is import to check your primer indentations for a sufficient primer strike.
This is not an article on how to disassemble the Beretta and reassemble it. There is an excellent video on this by MCARBO. The video shows the disassembly, polishing of parts, and reassembly of the Beretta 92. The video is about installing the MCARBO Pro trigger kit but the kit is not necessary. The video does not address using the Landon Enhanced trigger bar or the Match Hammer but shows how to install the hammer and trigger bar. It also shows how to remove and reinstall the sear and sear spring.
The video presented below has been shortened to only show the installation of the trigger components and polishing. The complete video shows installing components for the slide as well, the slide portion has been edited out. The entire video on the MCARBO kit can be viewed by clicking the link: MCARBO YouTube Video.
Steps - Each step will list the advantage gained.
Hammer Spring – Reducing DA weight
Replacing the stock hammer spring with the 12# hammer spring yields the following results on the 92x. The results are even more dramatic with a stock 92FS DA
/SA
| DA | SA | |
|---|---|---|
| Stock | 7,5.8 | 5,2.8 |
| 12# Spring | 5,12 | 3,15.2 |
| 13# Spring | 6,8 | 3,15.2 |
When changing the hammer spring, it is recommended to examine your primer strike on different cartridges as it can vary widely depending on the primer used in the cartridge. With some cartridges, the primer is larger and not as recessed. After examining my firing pin strikes on the cartridge primers, I decided to use the 13# spring.See the images below to view the difference in primer strikes.
| 12# Hammer Spring - two different cartridges | 12# Hammer Spring versus 13# Hammer Spring |
|---|---|
 |
 |
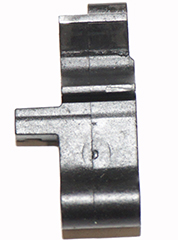
Landon Optimized Trigger Bar - Short reset and no over-travel
Installing the Landon Trigger does not affect pull weights but will change the reset to an incredibly short reset and will eliminate over-travel. The 92x has negligible over-travel but the 92FS has considerable over-travel. in my opinion, the Optimized Trigger Bar from Langdon Tactical is an absolute necessity if you want a great 92 SA trigger.
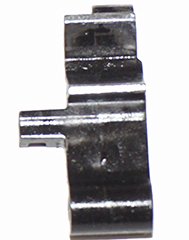
Polishing Parts - Reducing friction
After installing the 12# trigger spring my trigger weights were: DA = 6,6.1 and SA = 3,15.2.
Next came the polishing of the sear and hammer rod end. This resulted in a small reduction of weights but increases smoothness of operation. Then new weights were SA = 3,12. There was no reduction in DA weight. Check out the MCARBO video for polishing. How much you want to do is an individual thing and what is listed here is the results I achieved.
| Stock Sear | Polished Sear | Polished Hammer Bar |
|---|---|---|
 |
 |
 |
Sear Spring Modification – Achieving the Desired Trigger Pull
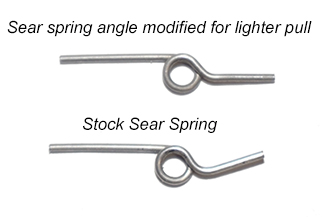
At this time, if the SA pull weight is acceptable, there is no reason to modify the sear spring. If you desire a lower pull weight or a higher pull weight the angle of the spring can be changed to achieve it. I reduced my SA pull weight to 2,15 by decreasing the angle on the sear spring as shown below. My 92FS had a trigger pull below 2# from some past work and wearing in. I was able to increase the angle on the sear spring to increase the SA trigger pull to 2,14. It is quite easy to modify the sear spring angle with small needle nose pliers. Beretta sells 92 sear springs online if you need for a replacement or an extra.
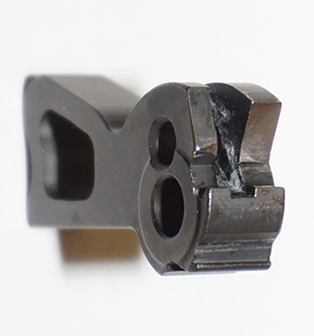
Match Hammer – Tuning the SA take-up
If you do not desire to modify the SA take-up then the Match Hammer is not necessary. You can use the stock hammer, the Landon Elite Hammer, or the Wilson Combat Hammer.
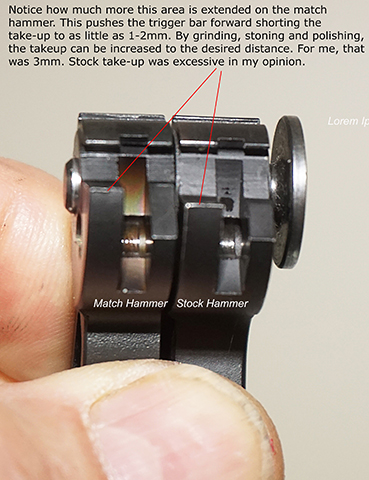
Installing the Match Hammer reduces the SA take-up to 1-2mm depending on the gun. With the Match Hammer the area where the trigger bar rests on the hammer after a reset has been extended to push the trigger bar forward shortening the take-up distance. By reducing the extended area through grinding and stoning, the take-up can be tuned to the desired travel. For me, that is 3mm. If the 1-2mm of SA take-up that a stock Match Hammer provides is the SA take-up desired, then tuning the Match Hammer is not necessary.
Note: As you are roving material from the match hammer, you will need to install the hammer periodically to measure the take-up. There is no other way to determine the amount to remove.
 |
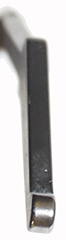
Match Hammer after reducing extended area and polishing. Some polishing compound still showing.
|
|---|
Additional Notes:
I also replaced the trigger on both the 92FS and the 92x with the Langdon NP3 Trigger. It is the same trigger as the stock 92 steel trigger but the finish is smoother and made the trigger more comfortable and easier for my finger to find the sweet spot. It also looks cool. Certainly, this is an individual preference.
If you are upgrading a 92FS or older 92, I recommend replacing the trigger spring. A new one can be ordered from Langdon Tactical or Beretta. The 92FS pictured here was also upgraded with the Langdon stainless 4.75” target crown barrel and Wilson G10 Ultra-Thin Grips. Obviously, the slide was upgraded to the Landon Vertec, Elite, RDO slide and a Holoson 507C-X2 Optic was added. The addition of the Landon RDO slide makes the Beretta 92 an incredible shooting machine. Landon's RDO solution is the best RDO solution for the Beretta 92 by far.
The modifications in this article have been tested by shooting many types of ammunition and thousands of rounds. I did this procedure using the 12# hammer spring. Later I went back and revised it to show the difference between the 12# and 13# hammer spring.
As with all technical articles on guns any modification described should be done by a qualified person or gunsmith and the article is only for guidance.
See RDO Considerations and Targeting Calculator
See Beretta RDO Mounting Options
Author: Steve Gill
Pistolthoughts.com
Date of last edit: Jan 23,2022